Build the curriculum
Add sections and topics, and put them in order.
The curriculum is the outline of your course: its sections, and the topics inside each one. This page shows you how to add, reorder, publish and remove them.
Before you start
- Create the course first.
- Plan your outline on paper: a few sections, each with a few short topics.
Open the curriculum
- Click Courses, then click the course's card.
- Click the Curriculum tab at the top of the course.
If you have just clicked Save & Continue on a new course, you are already there.
Add a section
- Click Add Section. A new section appears with its title ready to type. The other sections fold away so the new one is in view.
- Type the section's name, such as "Week 1: Introductions", and press Enter.
- To add more sections, click Add Section again, or Add another section at the bottom of the page.
To rename a section later, click its title, or click the pencil icon next to it. You can also choose Rename from the section's ⋮ menu.
Add topics
You can name all of a section's topics first, and fill them in later.
- On the section's row, click + Topic. A box opens at the bottom of the section.
- Type the topic's name and press Enter, or click Add. Paatya adds it as a Draft topic.
- The box stays open, so you can type the next topic's name straight away.
- When you have added them all, click Done, or press Escape.
Fill in a topic
- Click the topic's name. The topic's page opens. You can also choose Edit content from the topic's ⋮ menu.
- Add the topic's content using the tabs: Video, Quiz, Documents and Settings. Everything saves automatically. You'll see "Saved" at the top of the page.
- When the topic is ready, click Publish topic.
For each kind of content, see:
Rename a topic
On the Curriculum page, click the pencil icon next to the topic's name, or choose Rename from its ⋮ menu. Type the new name and press Enter.
Note: Clicking a topic's name opens the topic. To rename it, use the pencil icon.
Topic settings
In the topic editor, the Settings tab has four options:
- Lesson description: what the topic covers. Students see it on the topic's overview.
- Required for completion: when on, a student must finish this topic before the course counts as complete. Turn it off for optional extras.
- Estimated completion time: minutes, for a topic without a video. For a topic with a video, the video's own length is used.
- Free lesson: any student can open this topic, with its quiz and documents, from Free courses, without being enrolled. See Free courses and free lessons.
Publish or unpublish a section
Each section has its own status, as well as each topic.
- To hide a section from students, click Unpublish on the section's row. The section shows an Unpublished label. Students see none of its topics, even the published ones.
- To show it again, click Publish on the section's row. Its published topics come back. Its draft topics stay hidden.
Unpublishing a section doesn't change its topics' own status, and students keep their progress on them.
Publish or unpublish a topic
- In the topic's page, click Publish topic or Unpublish.
- Or, on the Curriculum page, choose Publish or Unpublish from the topic's ⋮ menu.
Show or hide topics
- Click the arrow next to a section's title to fold it away or open it again.
- Click Expand all or Collapse all above the sections.
Paatya remembers which sections you folded away, in this browser, the next time you open the course.
Put things in order
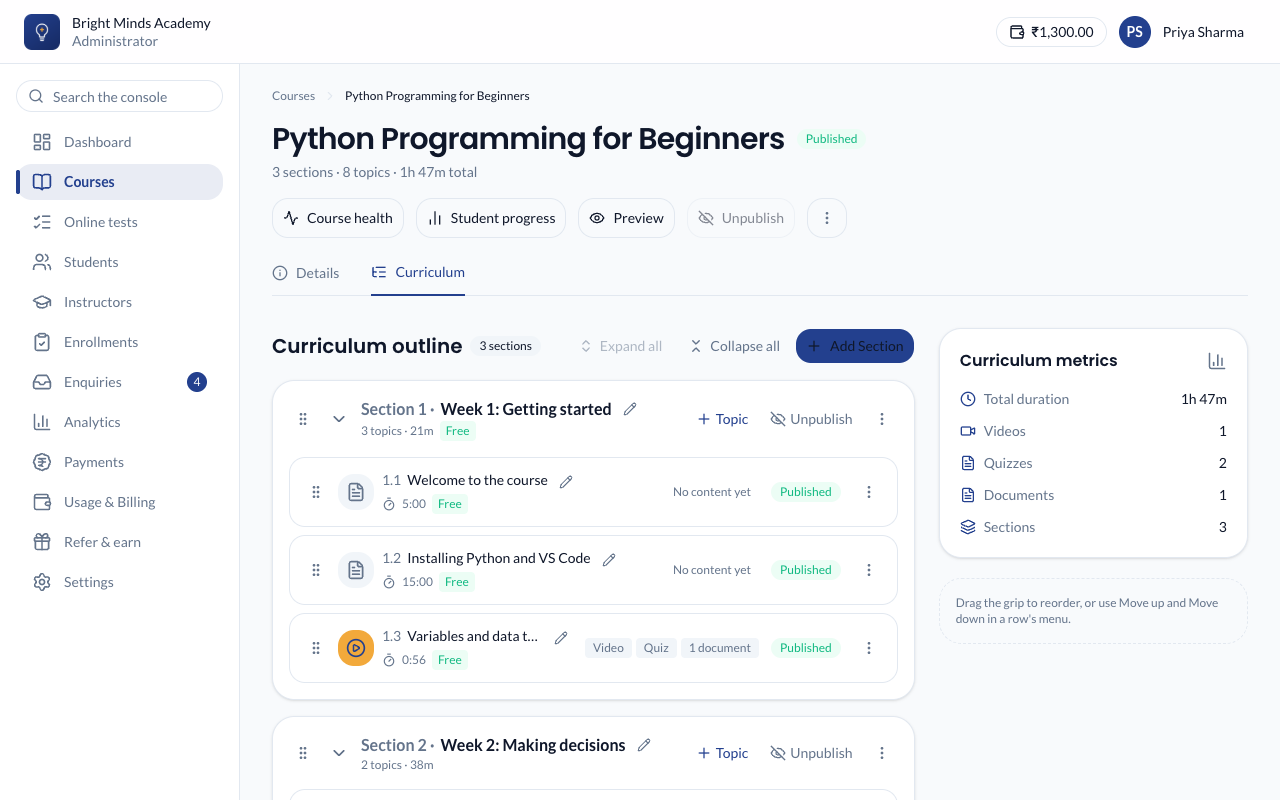
- Drag a section or a topic by its grip (the dotted handle on the left). You can drag a topic into a different section.
- Or use Move up and Move down in the section's or the topic's ⋮ menu.
- To move a topic to another section, open its ⋮ menu and choose Move to section.
Copy a section
Open the section's ⋮ menu and choose Duplicate. Paatya adds a copy straight after it, named "(copy)". The copy includes every topic, with its video, quiz, documents and links.
Delete a section or topic
- A section: open its ⋮ menu, choose Delete, then Delete section. Its topics go with it, along with their videos, quizzes and documents.
- A topic: open its ⋮ menu, choose Delete, then Delete topic.
Warning: Deleting can't be undone. If students have already started a topic, deleting it removes their progress on it. Choose Unpublish instead to hide the topic and keep their work.
What you'll see
- Each section row shows its number of topics and total length, and an Unpublished label if it's hidden from students.
- Each topic row shows its number (such as 1.2), its length, its content (Video, Quiz, documents) and its status badge. A topic with nothing in it yet shows No content yet.
- The Curriculum metrics panel adds up the total length, videos, quizzes, documents and sections.
- To check what students will see, click Preview at the top of the course. See Preview a course as a student.
If something goes wrong
- "Order not saved". Your change to the order didn't reach Paatya. Check your connection and drag again.
- Students can't see a new topic. Make sure the topic is Published, not Draft, and that its section isn't marked Unpublished.
Next step
Add a video to your first topic.