Publish, clone, archive or delete
Preview, publish or unpublish a course, start a new one from it, retire it, or remove it.
When your course is ready, you publish it so enrolled students can start learning. Before you do, you can preview it as a student. Later you can unpublish it to rework it, archive it to retire it, or delete it if nobody has been enrolled. You can also clone a course to start a new one from it. This page explains them all.
The buttons for all of these are at the top of the course, on both its Details and Curriculum tabs: Preview, Publish (or Unpublish), and a ⋮ menu with Clone, Archive and Delete. You'll find the same actions in the course card's ⋮ menu on the Courses page.
Preview a course as a student
Preview shows the course the way an enrolled student sees it: only its published sections and topics. You can play the videos, open the documents and try the quizzes. Nothing you do in the preview is saved.
- Open the course. Click Courses, then the course's card.
- Click Preview at the top of the course. On the Courses page, you can also click the eye icon on the course's card.
- Look through the course as a student would.
- Click Close preview in the bar at the top. You go back to the page you opened the preview from.
Note: A draft topic, or any topic in an unpublished section, doesn't appear in the preview. Publish it first if you want to see it there.
Publish a course
Before you start
At least one topic must be published. Open each finished topic and click Publish topic, or use Publish in the topic's ⋮ menu on the Curriculum page. See Build the curriculum.
Steps
- Open the course. Click Courses, then the course's card.
- Click Publish at the top right of the course. You can also use Publish in the course card's ⋮ menu on the Courses page.
- Read the message and click Publish course to confirm.
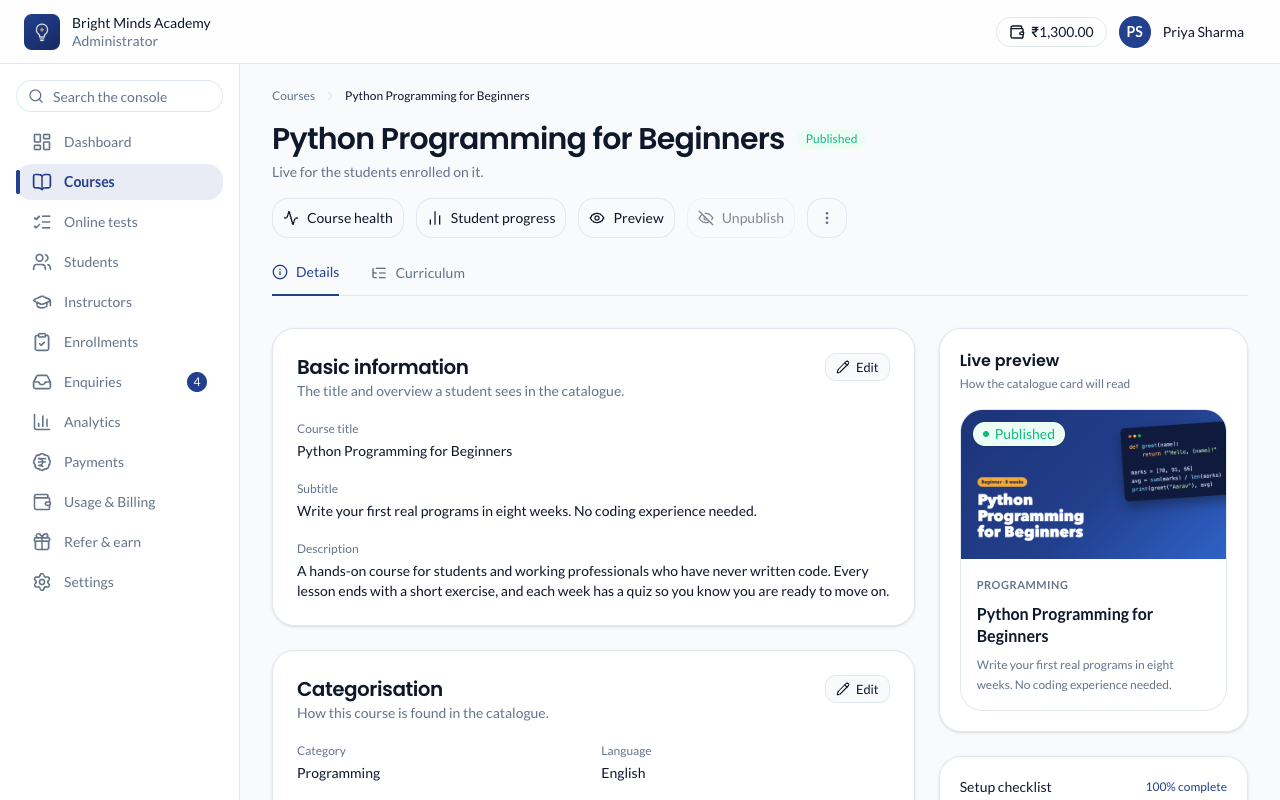
What you'll see
- The course's badge turns green: Published.
- On the Details tab, under the course's name, it says "Live for the students enrolled on it."
- Students already enrolled on the course can open it straight away.
- The course can appear on your academy's public page. See What visitors see.
Note: Publishing doesn't put anyone on the course. You still enroll students yourself.
Add to a published course
You can keep working on a published course. New topics start as Draft, and students only see them once you publish them. To hide a topic again, click Unpublish in its editor. Students keep any progress they had on it.
To hide a whole section, click Unpublish on the section's row on the Curriculum page. Its topics are hidden from students until you publish the section again. See Build the curriculum.
Unpublish a course
Unpublish a course to take it back to Draft while you rework it. You can only do this while nobody is enrolled on it.
- Open the course and click Unpublish at the top right. Or choose Unpublish from the course card's ⋮ menu.
- Click Unpublish course to confirm.
The badge changes to Draft. Each section and topic keeps its own status, so when you publish the course again, students see exactly what was there before.
Note: If students are enrolled, Unpublish is greyed out and Paatya shows "… enrolled — archive it instead". Archive the course instead.
Archive a course
Archive a course you no longer teach. It disappears from your students' screens, but every enrollment and everything students did is kept.
- Open the course, click the ⋮ menu at the top right, and choose Archive. Or choose Archive from the course card's ⋮ menu.
- Click Archive course to confirm.
The badge changes to Archived. To bring the course back, publish it again.
Delete a course
Deleting removes the course, with all its sections, topics, videos, quizzes and documents.
- Open the course, click the ⋮ menu at the top right, and choose Delete. Or choose Delete from the course card's ⋮ menu.
- Click Delete course to confirm.
Warning: Deleting can't be undone. You can only delete a course that has no students enrolled. If anyone is enrolled, Paatya shows "… enrolled — archive it instead". Archive the course instead.
Clone a course
Clone a course to start a new one from it, such as next year's batch. The clone is an exact copy: its details, price, cover, sections, topics, videos, documents, links and quizzes.
- Choose Clone from the course card's ⋮ menu on the Courses page, or from the ⋮ menu at the top right of the course.
- Type a name for the clone. Paatya suggests the course's name with "(copy)" after it.
- Click Clone. The clone opens on its Details tab.
What you'll see
- The clone is a Draft, whatever the original was. Students see nothing until you publish it.
- Inside the clone, each section and topic keeps the status it had, so publishing the clone makes the same topics visible as in the original.
- Students, enrollments, progress and quiz results stay with the original. Nobody is enrolled on the clone.
Tip: You can rename the clone later: click Edit on the Basic information card of its Details tab.
Which one should I choose?
| You want to… | Do this |
|---|---|
| Check what students will see | Preview |
| Let enrolled students start the course | Publish |
| Take a course nobody is enrolled on back to a draft | Unpublish |
| Stop teaching a course but keep the records | Archive |
| Remove a test course nobody is enrolled on | Delete |
| Start a new course from this one | Clone |
If something goes wrong
- "Publish at least one topic first". Open a topic that's ready and click Publish topic, then publish the course.
- Students can't see the course. Check the course is Published, and that each student is enrolled on it. Students only see published topics in published sections, too.
- The Delete or Unpublish option is greyed out. Students are enrolled. Archive the course instead.
Next step
Enroll students on your published course.