Find and manage students
Search, filter, edit, deactivate and restore.
The Students page lists everyone with a student account in your academy, and how far they have got. From here you can find a student, change their details, and stop or restore their access.
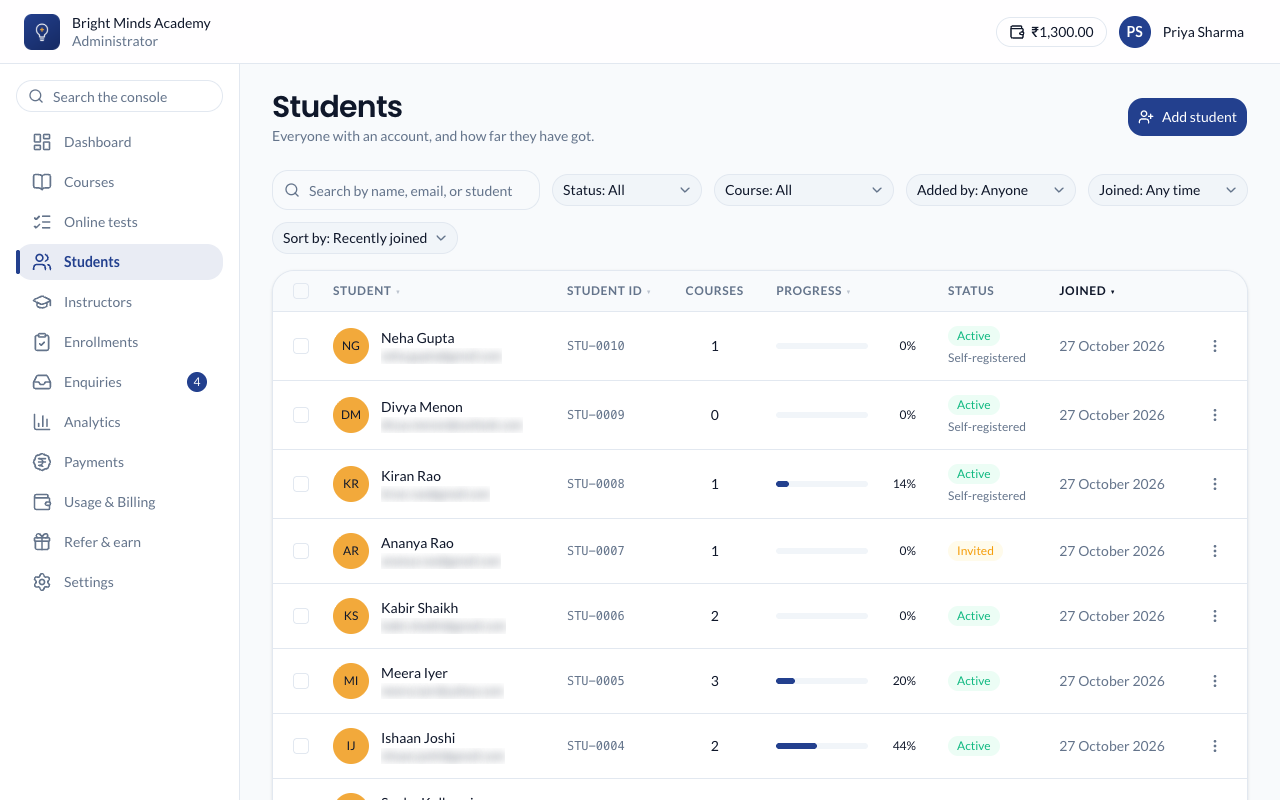
Find a student
- In the left menu, click Students.
- Type in the search box. It searches name, email and student ID.
- Narrow the list with the filters:
- Status: Active, Inactive or Invited.
- Added by: students you added, or those who signed up themselves.
- Course: only students on one course.
- Joined: Any time, Last 7 days, Last 30 days, Last 90 days or Last year.
- Change the order with the sort menu: Recently joined, Name, Student ID or Progress. You can also click a column heading.
The list shows each student's Student ID, number of Courses, overall Progress, Status and when they Joined.
What the statuses mean
| Status | What it means |
|---|---|
| Invited | The account exists, but the student has not set a password yet. |
| Active | The student has set a password and can sign in. |
| Inactive | You have deactivated the student. They cannot sign in. |
Edit a student's details
- Find the student and click the ⋮ menu at the end of their row.
- Click Edit details.
- Change what you need, then click Save changes.
You can also click Edit on the student's own page.
In the edit form, click a course to add it or to take it away. Taking a course away deletes everything the student did on it, so when you click Save changes Paatya lists the courses being removed and asks you to confirm. A course on which the student has earned a certificate cannot be taken away. You can also use Remove from course. See Track and remove enrollments.
Change a student's email address
Changing the email address is treated as a new invitation, because the new address has not been proven yet.
- Open Edit details and type the new Email address.
- Click Save changes.
- Paatya asks "Change their email address?". Click Change it and re-invite.
What happens next:
- The student's password is cleared and they are signed out everywhere.
- Their status goes back to Invited.
- A fresh activation link goes to the new address.
- Their courses and progress are not touched.
Deactivate a student
Deactivate a student when they should no longer get in, for example when they leave your institute.
- Click the ⋮ menu on the student's row, or on their own page.
- Click Deactivate.
- Confirm by clicking Deactivate again.
A message confirms it. The student is signed out straight away and cannot sign in again. Nothing is deleted: their enrollments, progress, quiz results and certificates all stay.
Restore access
- Filter the list by Status: Inactive to find the student.
- Click the ⋮ menu and click Restore access.
A message confirms it. A student who had set a password becomes Active and can sign in with it again. A student who never set a password becomes Invited and receives a fresh activation link.
Resend an invitation
If a student with the status Invited lost their activation email, or the link expired, click the ⋮ menu and click Resend invitation. See Add a student.
Note: Restoring a student counts as adding a student, so it needs balance in your academy.
Unblock a student
After 3 wrong passwords in a row, a student's sign-in is blocked for 30 minutes. Their row shows Blocked, and their page shows Blocked until a time. It lifts by itself; to let them in sooner:
- Click the ⋮ menu on the student's row, or on their own page.
- Click Unblock sign-in.
They can sign in straight away with their password. If they've forgotten it, they can use Forgot password?, or you can set a temporary password.
Set a temporary password
If a student can't receive email, for example they have no email address of their own, you can give them a password yourself:
- Click the ⋮ menu next to the student and click Set temporary password.
- Type a password. It must meet the same rules as any password.
- Click Set password, then share the password with the student in person.
The student can sign in straight away. The first time, they're asked to accept the Terms, and until they choose their own password they're reminded to change it. Any activation link you sent earlier stops working, and the student is signed out everywhere.
Note: You can't set a password for a deactivated student. Restore their access first.
If something goes wrong
- A student can't find the courses you gave them. See Troubleshooting.
- "Please add balance to continue" when restoring. Add balance and try again.