Add a student
Create a student account and send the welcome email.
Every learner in your academy has a student account. You create them here, unless you have let students sign up themselves. This page shows you how to add a student and send them the email that lets them in.
Before you start
- You need the student's first name, last name and email address. Everything else is optional.
- Your academy needs balance. A new academy has welcome credit to start with; once your balance runs out, adding students is paused until you recharge. See Add balance.
- If you want to put the student on a course straight away, create the course first.
Add a student
- In the left menu, click Students.
- Click Add student at the top right. On a phone, tap the Add student button at the bottom of the screen.
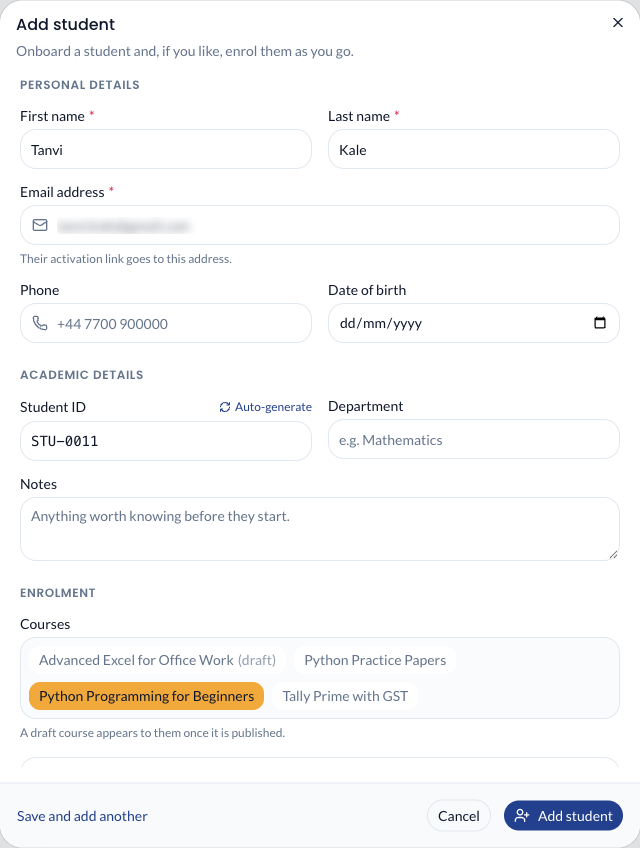
- Under Personal details, fill in First name, Last name and Email address. You can also add a Phone number and a Date of birth.
- Under Academic details, you can fill in:
- Student ID: leave it empty and Paatya creates one for you, such as
STU-0012. Click Auto-generate to see the next ID before you save. - Batch or cohort, such as "Morning batch" or "2026 A".
- Department.
- Notes: anything you want to remember about this student. Only admins see notes.
- Student ID: leave it empty and Paatya creates one for you, such as
- Under Enrolment, click the courses the student should join. A course turns highlighted when it is picked. You can skip this and enroll them later. If a course has a Default access period, the student gets an end date from it automatically. You can change it later on the student's page.
- Leave Send a welcome email switched on.
- Click Add student. To add several people one after another, click Save and add another instead.
Tip: On the dashboard, Quick actions → Add student opens the same form.
What you'll see
- A message at the top of the screen, such as "Priya Sharma added. An activation link is on its way to them."
- The student appears at the top of the Students list with the status Invited.
- The student receives an email with an activation link. They click it, choose their own password and click Activate Account. Their status then changes to Active.
The activation link works for 7 days. You never see the password the student chooses.
If you switched off the welcome email
A student added without the welcome email cannot sign in: they have no password and no link. To send them a link later:
- Open the student's ⋮ menu in the Students list, or on their own page.
- Click Resend invitation.
A message confirms "Invitation sent". Resend invitation only appears while the student's status is Invited. Each new link replaces the previous one, so tell the student to use the newest email.
If the student can't receive email at all, give them a password yourself instead: open the ⋮ menu, click Set temporary password and share it with them in person. They're asked to choose their own after signing in. See Find and manage students.
If something goes wrong
- "Please add balance to continue". Your academy has no balance yet, or it has run out. Add balance, then try again.
- "Somebody already has an account with that address". One email address can belong to only one account. Search the Students list for it: the person may already be there, perhaps as Inactive. An admin's email address can't be used for a student either.
- The student says the email never arrived. Ask them to check their spam folder. Check the address under Details & notes on their page. If it was wrong, correct it (see Find and manage students); a fresh link goes to the new address.
- The link has expired. The student sees "This activation link is no longer valid." Click Resend invitation, as described above. The student can also get a fresh link themselves by clicking Forgot password? on the sign-in page.
Next step
- Enroll students on your courses.
- Find and manage students.