Your landing page
Build, preview and publish the page visitors see first.
Your landing page is what visitors see when they open your academy's address without signing in. It can show your courses, introduce your trainers, share what learners say, and collect enquiries. You build it from ready-made blocks under Settings → Landing page. No design skills are needed.
Note: Your academy always has a public page, even before you build one. Until you publish your own, visitors see a starter page made from your academy's name, tagline and published courses, with a contact form. See What visitors see.
Open the page builder
- In the left menu, click Settings.
- In the settings menu, under Website, click Landing page.
The bar at the top tells you where your page stands:
- Your page is live or Visitors see the starter page
- Unpublished changes: you have saved changes that visitors don't see yet
- Not saved: you have made changes on this screen that aren't saved yet
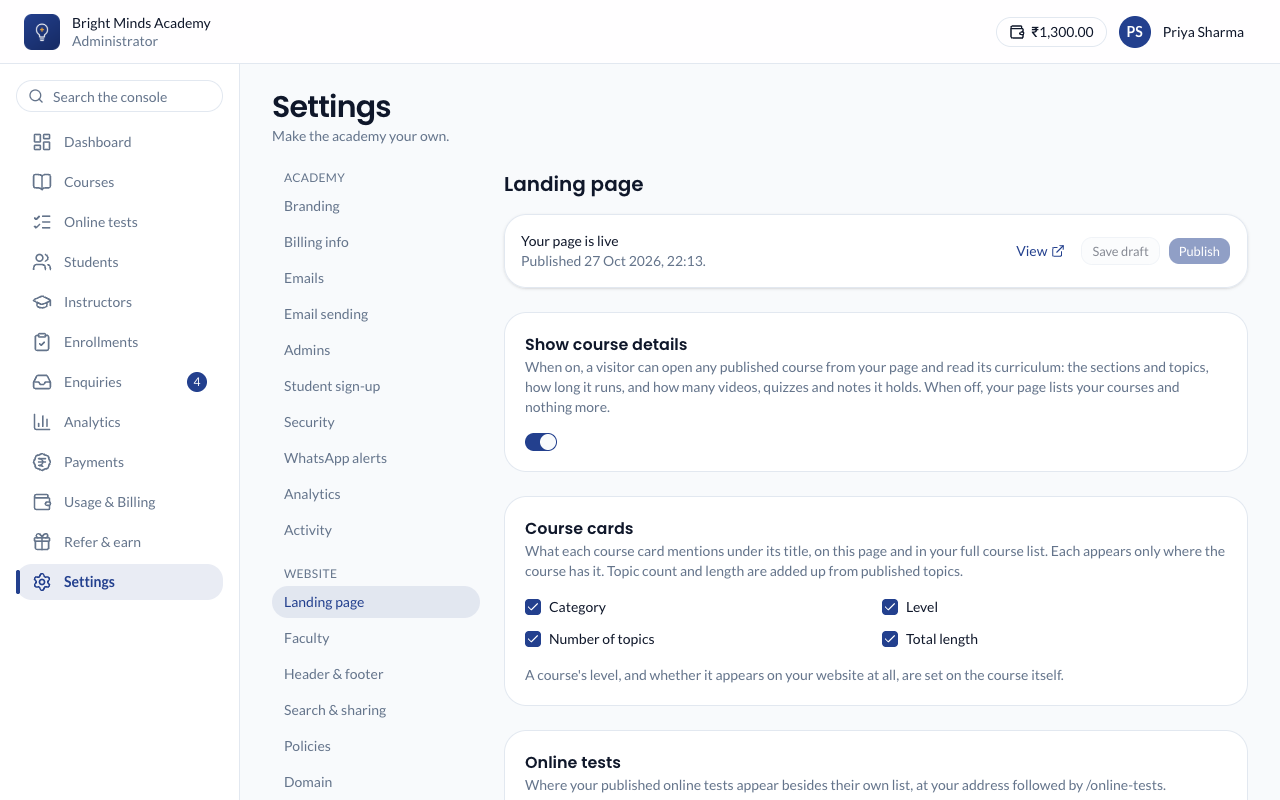
Save, preview and publish
Your work is saved as a draft. Visitors keep seeing the live page until you publish, so you can work on your page over several sittings.
- Make your changes, then click Save draft. You'll see "Changes saved. Visitors see them once you publish."
- Click Preview. Your page opens in a new tab exactly as it will look, with a dark bar at the bottom saying visitors don't see it yet.
- When you're happy, click Publish. You'll see "Published. Visitors see your page now."
Publish stays greyed out while you have changes that aren't saved. Save them first.
- Discard changes throws away your draft and brings back the live page in the editor. Visitors notice nothing.
- Show the starter page instead, at the bottom of the screen, takes your page down. Visitors see the starter page again. Your own page is kept, and Publish brings it back.
Note: Some settings take effect as soon as you click Save draft, without publishing: Show course details, Course cards and the Online tests switches. They change how your courses appear rather than what your page says.
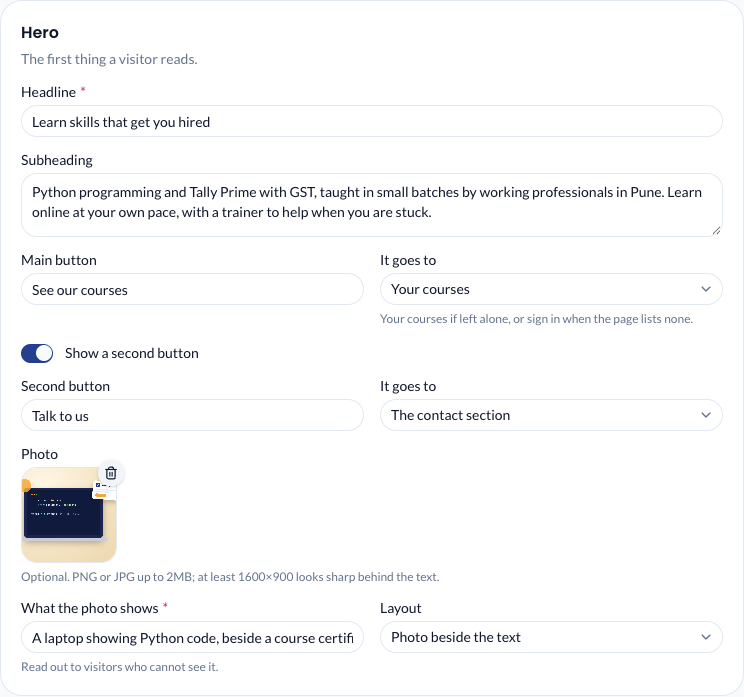
Write the hero
The hero is the first thing a visitor reads, at the top of the page.
- Headline (required): for example "Learn skills that get you hired".
- Subheading: one or two sentences about what you teach.
- Main button and It goes to: the button's words, and where it takes the visitor: Your courses, Your online tests, The contact section or Sign in. Left alone, it goes to your courses, or to sign in if the page lists none.
- Show a second button: a second, outlined button, with its own words and destination. For example "Talk to us", going to The contact section. Switch it off to show only the main button.
Add a photo
- Under Photo, click Upload and choose a PNG or JPG, up to 2 MB. It is saved as soon as you choose it.
- Fill in What the photo shows (required). It is read out to visitors who can't see the picture.
- Choose a Layout:
- Brand colour, no photo: your colours only. The photo is kept but not shown.
- Photo beside the text: the photo sits on the right, cropped to a 4:3 shape.
- Photo behind the text: the photo fills the hero, darkened so the words stay readable.
Tip: Choose a photo with nothing important near its edges, because it is cropped to fit. A picture of at least 1600×900 pixels looks sharp.
Add blocks
- Click Add block and choose a type.
- Fill in the block. Most blocks have a Section title you can change.
- Use the up and down arrows to move a block, and the bin to remove it.
You can have up to 20 blocks.
| Block | What it shows |
|---|---|
| Features | Up to six short points about why to learn with you, each with an icon you choose and an optional line under the section title. |
| Courses | Up to 12 courses you pick. Only published courses shown on your website appear. |
| About the trainer | A name, role, a few paragraphs and a photo (PNG or JPG, up to 2 MB). |
| Faculty | Everyone on your faculty, in the order you set. See Faculty. |
| Numbers | Figures such as "1,200 students taught". |
| Testimonials | Quotes from learners, with their name, their course, city or qualification, and an optional photo. Without a photo, their initials are shown. |
| Gallery | Up to 12 photos (PNG or JPG, each up to 2 MB). |
| Questions and answers | Common questions from visitors, with your answers. |
| Contact and enquiries | Your address, phone, email, hours, WhatsApp number and Google Maps link, and an enquiry form. |
| Text | A heading and free text. |
Hide a block for a while
Click the eye icon on a block to hide it from visitors. Its content is kept, and it shows Hidden in the editor. Click the eye again to bring it back. As with every change, save and publish for visitors to see it.
Choose what's in the menu
Each block has Link from the menu at the bottom. When it's ticked, the header at the top of your page links to that block. Type a shorter name beside it to use in the menu, for example "Why us" for a block titled "Why learn with us".
The menu shows at most six links. A block with no title and no menu name can't appear in it.
Choose what course cards show
Under Course cards, tick what each course card mentions under its title: Category, Level, Number of topics and Total length. Each appears only where the course has it. The number of topics and total length are added up from published topics.
These settings apply to course cards on your landing page and in your full course list. A course's level is set on the course itself. See Create a course.
Show online tests on your homepage and header
If you have online tests, the Online tests section has two switches. Both are on at first.
- Show online tests on your homepage: the starter page gets an Our online tests section under your courses. On your own page, online tests you pick in a Courses block show. Turn it off to keep your homepage to courses only.
- Show Online tests in the header: an Online tests link at the top of every page, beside your courses.
Either way, your online tests keep their own list at your address followed by /online-tests, and each keeps its own page. To take one online test off your website altogether, turn off Show on your website on its Details tab.
Collect enquiries
In a Contact and enquiries block, switch on Show the enquiry form. Visitors can then send you their name, email, phone and question. Each enquiry appears under Enquiries in the left menu. See Enquiries.
Add a WhatsApp number with its country code (in India, +91 and then the 10-digit number), and visitors can message you with one tap. Paste a Google Maps link and your address opens as directions.
Your Instagram, YouTube and other social links are set once under Header and footer, and appear in this block and in your footer.
Let visitors read your curriculum
The Show course details switch lets any visitor open a published course and read its sections and topics. It is off at first. See Show course details.
If something goes wrong
- "Say what the photo shows". The hero has a photo but What the photo shows is empty. Fill it in, then save again.
- "Could not save the page. Check every block has its text." A block has an empty required field, such as a feature with no title or a testimonial with no quote. Fill it in, or remove the empty item.
- A course is missing from the page. The course must be Published, have Show on your website on, and be ticked in the Courses block.
- Visitors still see the old page. Check the bar says Your page is live with no Unpublished changes. If it shows unpublished changes, click Publish. Then refresh your page.
- A block doesn't appear in the menu. Tick Link from the menu, and give the block a title or a menu name. Only the first six linked blocks fit.
- You can't add another block. You've reached the limit of 20.