Branding
Name, logo, colours, fonts and certificate details.
Branding makes the academy look like yours. Your name, logo, colours and fonts appear on every screen your students see, in your emails, on your public page and on certificates. You set it all under Settings → Branding.
Open Branding
- In the left menu, click Settings.
- In the settings menu, under Academy, click Branding.
The Preview on the right shows how your choices look as you make them.
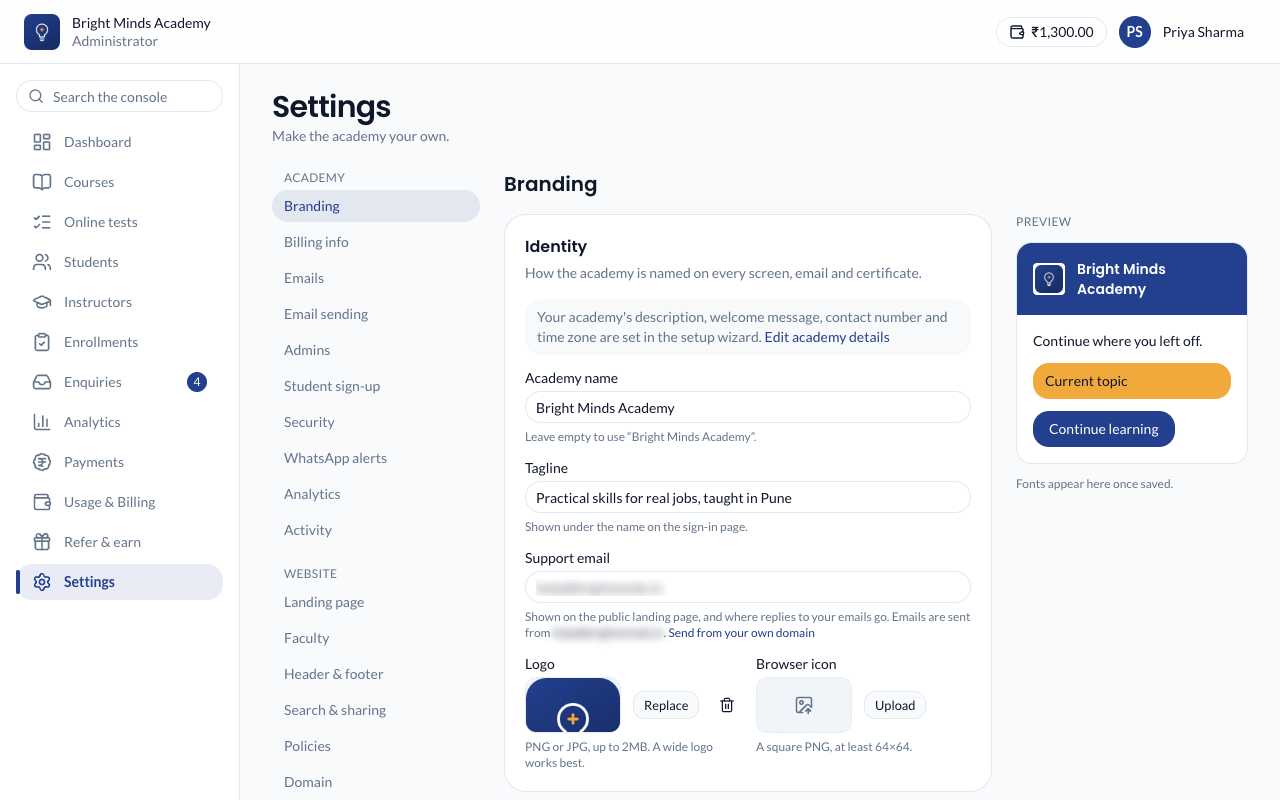
Identity
- Academy name: the name shown on every screen, email and certificate. Leave it empty to use the name you signed up with.
- Tagline: a short line shown under the name on the sign-in page.
- Support email: shown on your public website, in the footer and in your policies. When students reply to your emails, the replies go here.
- Logo: click Upload, then choose a PNG or JPG, up to 2 MB. A wide logo works best. Click Replace to change it. Until you upload one, your academy shows the Paatya logo.
- Browser icon: the small picture in the browser tab. Use a square PNG, at least 64×64 pixels. Until you upload one, the tab shows the Paatya icon.
Note: Your academy's emails are sent from Paatya's address, with your academy's name as the sender. When a student replies, the reply goes to your support email.
Academy details from the setup wizard
Your academy's description, welcome message, contact number and time zone are set in the setup wizard. To change them, click Edit academy details in the Identity panel. See The setup wizard.
Look
- Brand colour: your main colour, used for buttons, links and highlights. Click the colour box, or type a colour code such as
#0f766e. Lighter and darker shades are worked out for you. - Accent colour: optional, for highlights. If you leave it empty, it is worked out from your brand colour.
- Body font and Heading font: choose from 14 fonts, such as Inter, Poppins, Lato or Merriweather. Default keeps the standard font.
- Corners: how rounded buttons and cards are: Square, Slightly rounded, Rounded (default) or Soft.
Tip: Pick a brand colour that is dark enough for white text to be easy to read on it. Check the preview before you save.
Certificates
These details appear on the certificates your students earn when they finish a course. See Certificates.
- Signed by: the name printed as the signatory. If empty, each certificate is signed by the course's instructor (their name and designation), or just "Instructor" when the course names no instructor.
- Their title: for example "Founder" or "Lead Trainer".
- Credential prefix: 2 to 6 capital letters or digits at the start of each certificate's ID. The hint below the box shows an example, such as
BMA-2026-7Q4M2X. Existing certificates keep their IDs. - Signature: a picture of the signature. A PNG with a transparent background looks best.
Save your changes
Click Save branding at the bottom of the page. You'll see "Branding saved".
Logos, browser icons and signatures are different: each one is saved as soon as it finishes uploading.
What you'll see
Your new look straight away on your academy's screens, your public page and in new emails. Fonts show in the preview after you save.
If something goes wrong
- "Images must be a PNG or JPG". Save the image as PNG or JPG. SVG and WebP are not accepted.
- "Images must be 2MB or smaller". Export the image at a smaller size and upload it again.
- Your old logo still shows. Refresh the page. Your browser may be showing a saved copy.
- To remove an image, click the remove button next to it.
Related
- Your landing page
- Header and footer: social links, the sign-in button and your footer.
- Search and sharing: how your address looks on Google and WhatsApp.
- Email wording