Your students' experience
Activation, My Courses, lessons, quizzes and certificates.
This page walks through what your students see, from the welcome email to their certificate. Knowing it helps you answer students' questions and spot problems early.
Tip: The best way to learn this is to try it. Add yourself as a student using a second email address, enroll that account on a course, and go through it as a learner.
1. Activating their account
When you add a student with Send a welcome email switched on, they receive an email with an activation link.
- The student clicks the link. A page called Set your password opens, showing the email address you gave them.
- They choose a password. It needs at least 8 characters, one uppercase letter, one number and one special character, and can't be built on a very common password or word.
- They click Activate Account and are signed in.
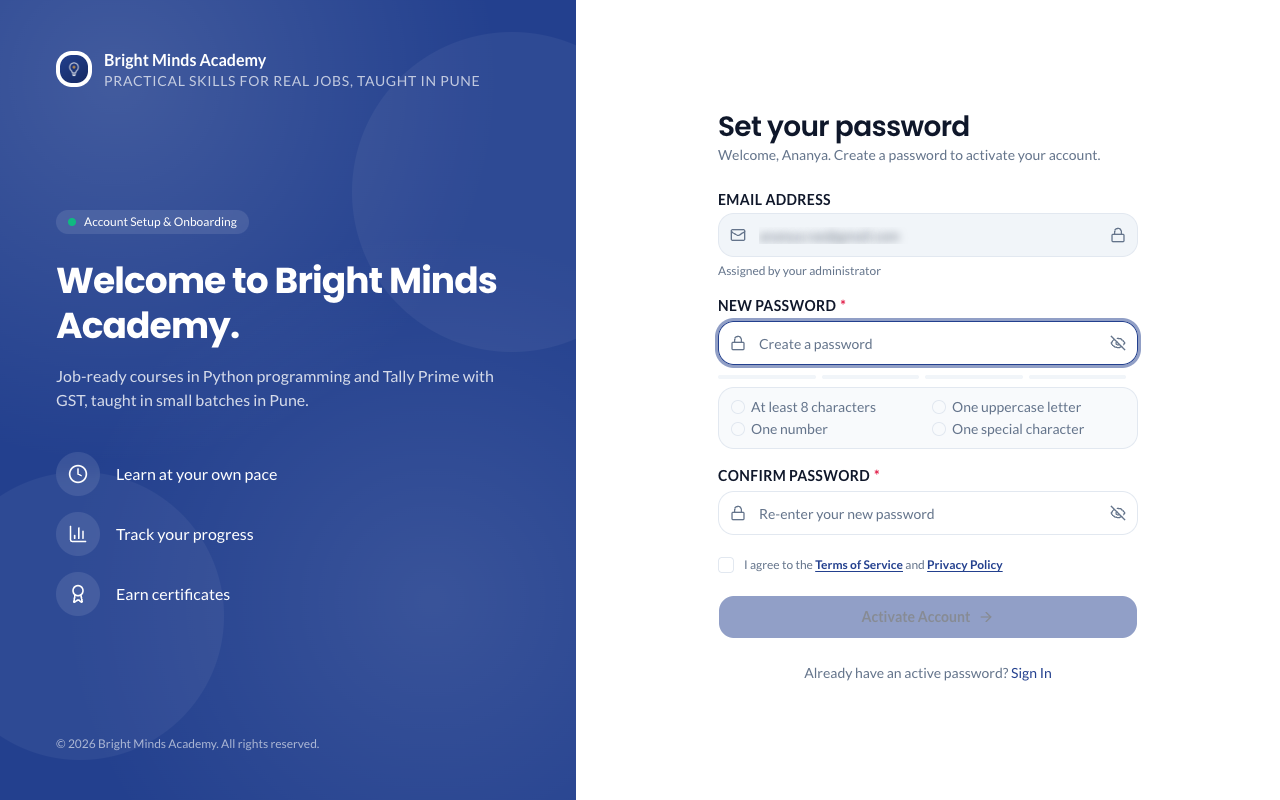
The link works for 7 days. After that the student sees "This activation link is no longer valid. Ask your administrator for a new one." See Add a student for how to send a new one.
If you gave the student a temporary password instead, they sign in with it straight away. The first time, they're asked to accept the Terms, and a reminder asks them to choose their own password until they do.
If you have turned on student sign-up, a new student can also click Create an account on your sign-in page, confirm their email with a code and choose a password.
2. Signing in
Students sign in at your academy's own address, for example yourname.paatya.net, using the sign-in button at the top of your public website. It reads Sign in unless you renamed it under Header and footer, for example to Student login. If they forget their password, they click Forgot password? on the sign-in page and get a reset link by email. The link lasts 60 minutes.
An account can be signed in on one device at a time. If a student signs in on their phone, they are signed out on their laptop, with a message explaining why. Sharing one account between two people doesn't work. Students stay signed in between lessons, and are signed out only after 7 days without using Paatya, or 30 days after signing in.
After 3 wrong passwords in a row, a student's sign-in is blocked for 30 minutes. You can unblock them sooner.
To change their password, students click their name at the top right, or tap Account at the bottom on a phone, and choose Change password.
3. My Courses
After signing in, students land on My Courses:
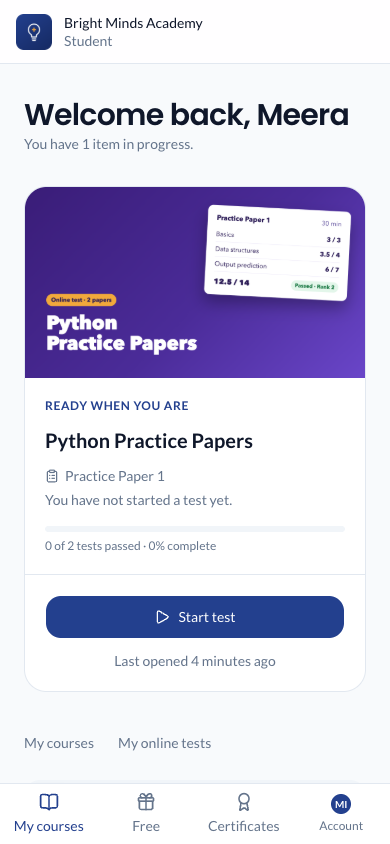
- A banner at the top takes them back to where they stopped, for example Resume at 12:40, or Start course for a course they haven't opened. For an online test it reads Start test or Next test and opens that test's start screen.
- A card for every course they are enrolled on, with their progress. They can filter by In progress, Completed and Not started.
- Your learning stats: courses enrolled, topics completed, hours learned and certificates earned.
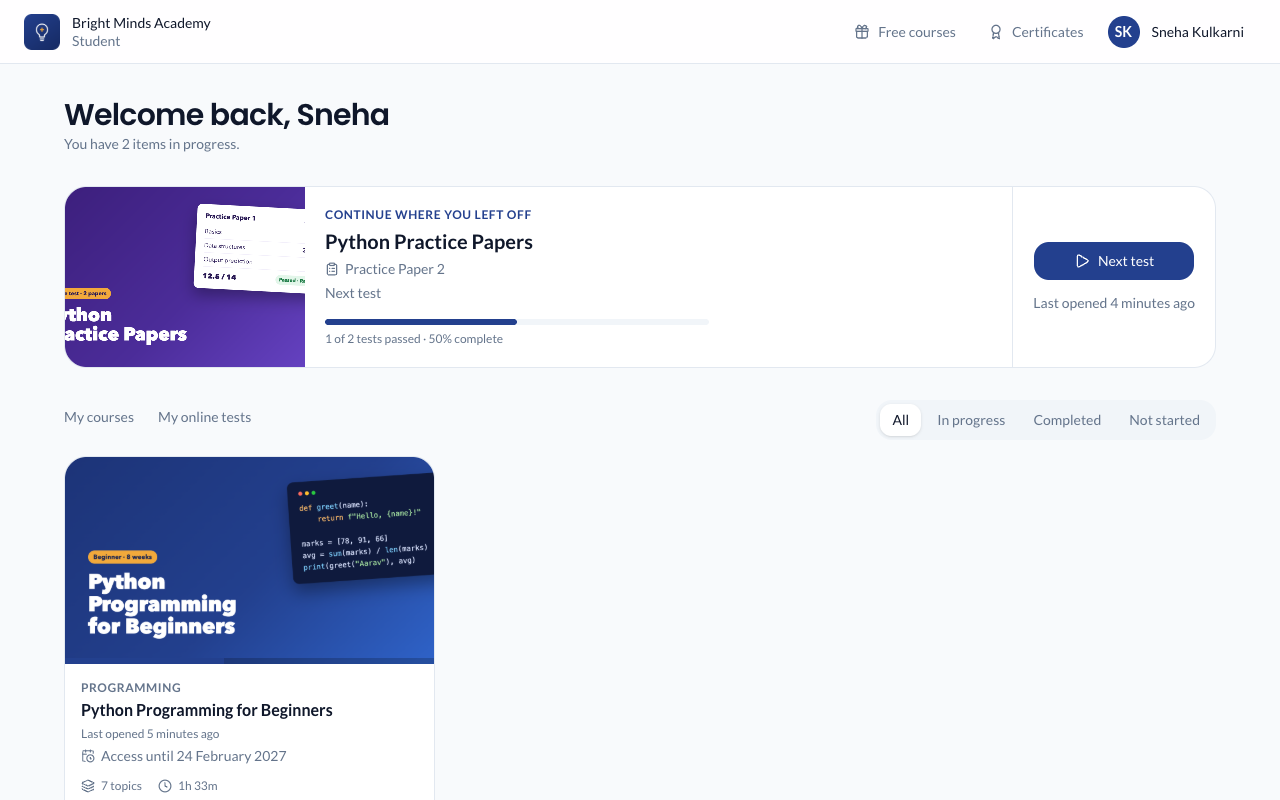
If you have free courses, students also get a Free courses link at the top, next to Certificates. There they can start a free course, or the free lessons of one, with Start for free. A student with no courses yet sees a Browse free courses button.
If they're on an online test as well as courses, My Courses has two tabs: My courses and Online tests. Opening an online test lists its tests, each with a Start test, Resume, Try again or View result button. Starting a test counts as opening the enrollment, so a student who only takes tests doesn't show as Not started to you.
If your academy sells courses online, a student who has bought a course finds it in My Courses like any other, and its receipt under My purchases in their account menu, at the top right.
Students only see courses that are Published. A course you haven't published, or have archived, doesn't appear, even if they are enrolled.
If an enrollment has an end date, the course card says Access until that date. From the day after, the course no longer appears. If the student opens an old link to it, they're told the date their access ended. They're reminded by email and in the app 7 days and 1 day before. Their progress and certificate are kept, so if you give them a later date they carry on where they stopped. See Access end dates.
4. Inside a course
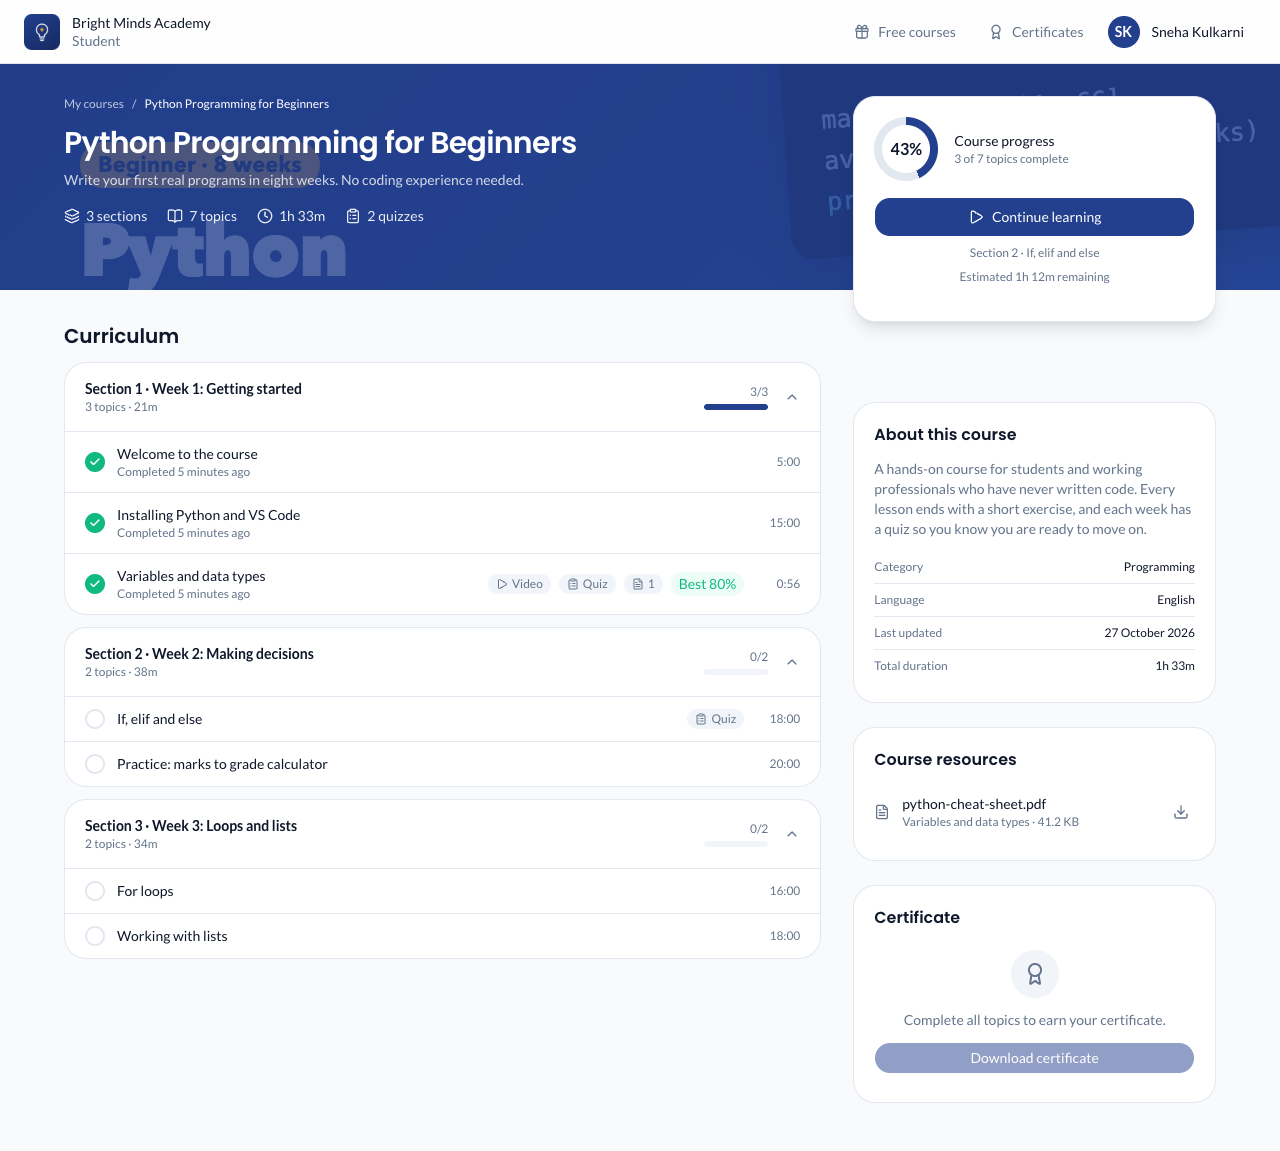
The course page lists the sections and topics, with a tick for each finished topic and the student's best quiz score.
Students can open any section. If you turned on Students must finish earlier sections first for the course, sections open in order instead: a section unlocks only when every required topic before it is finished, and a locked section tells the student what to finish first, for example "Complete Introduction to unlock". Topics marked Optional don't hold anything back.
Batches are on their own My batches tab, with their dates. See How batches work.
The page also offers the course's downloadable files under Course resources, and the certificate once they have earned it.
5. The lesson
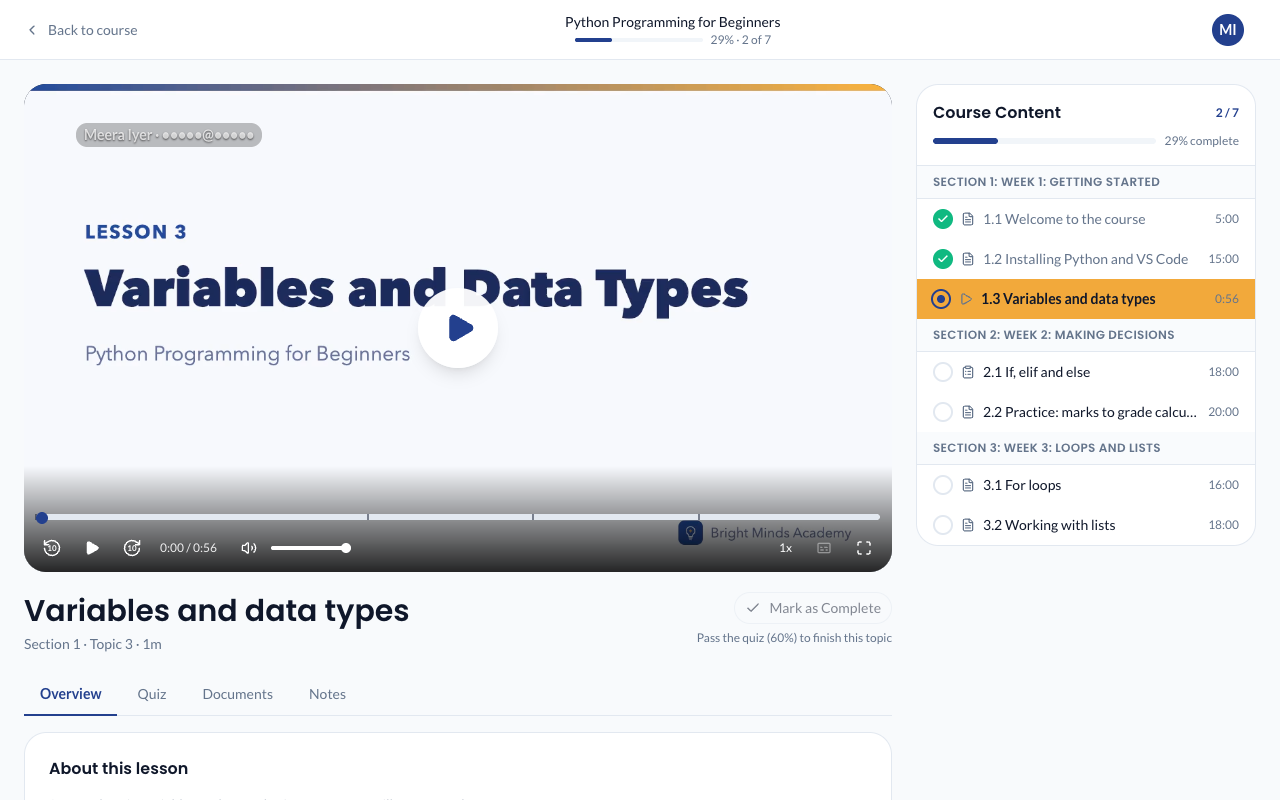
Each topic opens in the lesson player:
- The video starts where they left off. Start from beginning is always there. If you switched off skipping ahead, they can't jump past the part they have watched.
- Their name and the last 4 digits of their mobile number appear faintly over the video, moving every 20 seconds, or their email if you have no mobile for them. Nobody can stop a screen being recorded or filmed, but a copy that shows whose account it came from is one students don't share. They see only their own details.
- Their place is saved every few seconds, shown as Progress saved.
- Tabs underneath show the topic's description, the quiz, the documents and links, and private Notes the student can write for themselves. Notes save as they type; they can switch tabs or leave the lesson and find them there when they come back.
- Previous and Next Topic move through the course.
A topic is finished when the student watches the video to the end, or clicks Mark as Complete. If the topic has a quiz, the button stays disabled until they pass it, with a line such as "Pass the quiz (70%) to finish this topic". A topic with a quiz and no video finishes on its own when the quiz is passed.
6. Quizzes
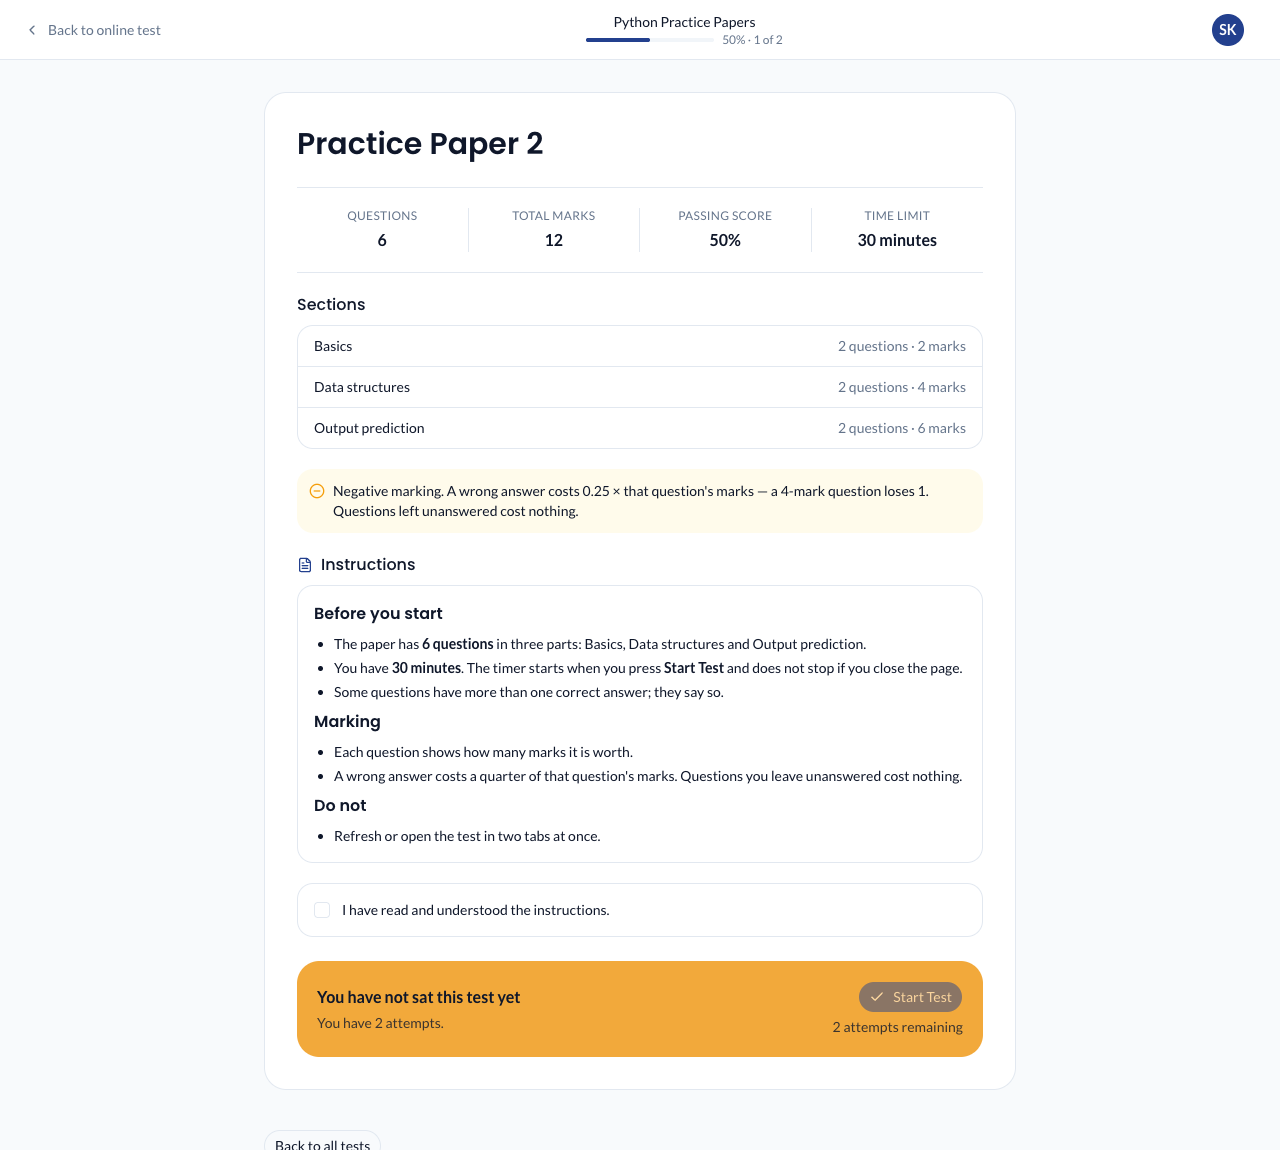
Students see the number of questions, the marks, the pass mark and the attempts allowed before they start, along with the categories and the negative-marking rule if the quiz has them. If you wrote instructions, they read them and tick I have read and understood the instructions before Start Quiz works (Start Test in an online test). If you set a time limit, a timer counts down and the quiz is submitted when it runs out.
Questions and answers keep the line breaks you typed. Pictures in a question or answer can be tapped to see them full size. In a quiz with categories, the categories show as tabs above the question.
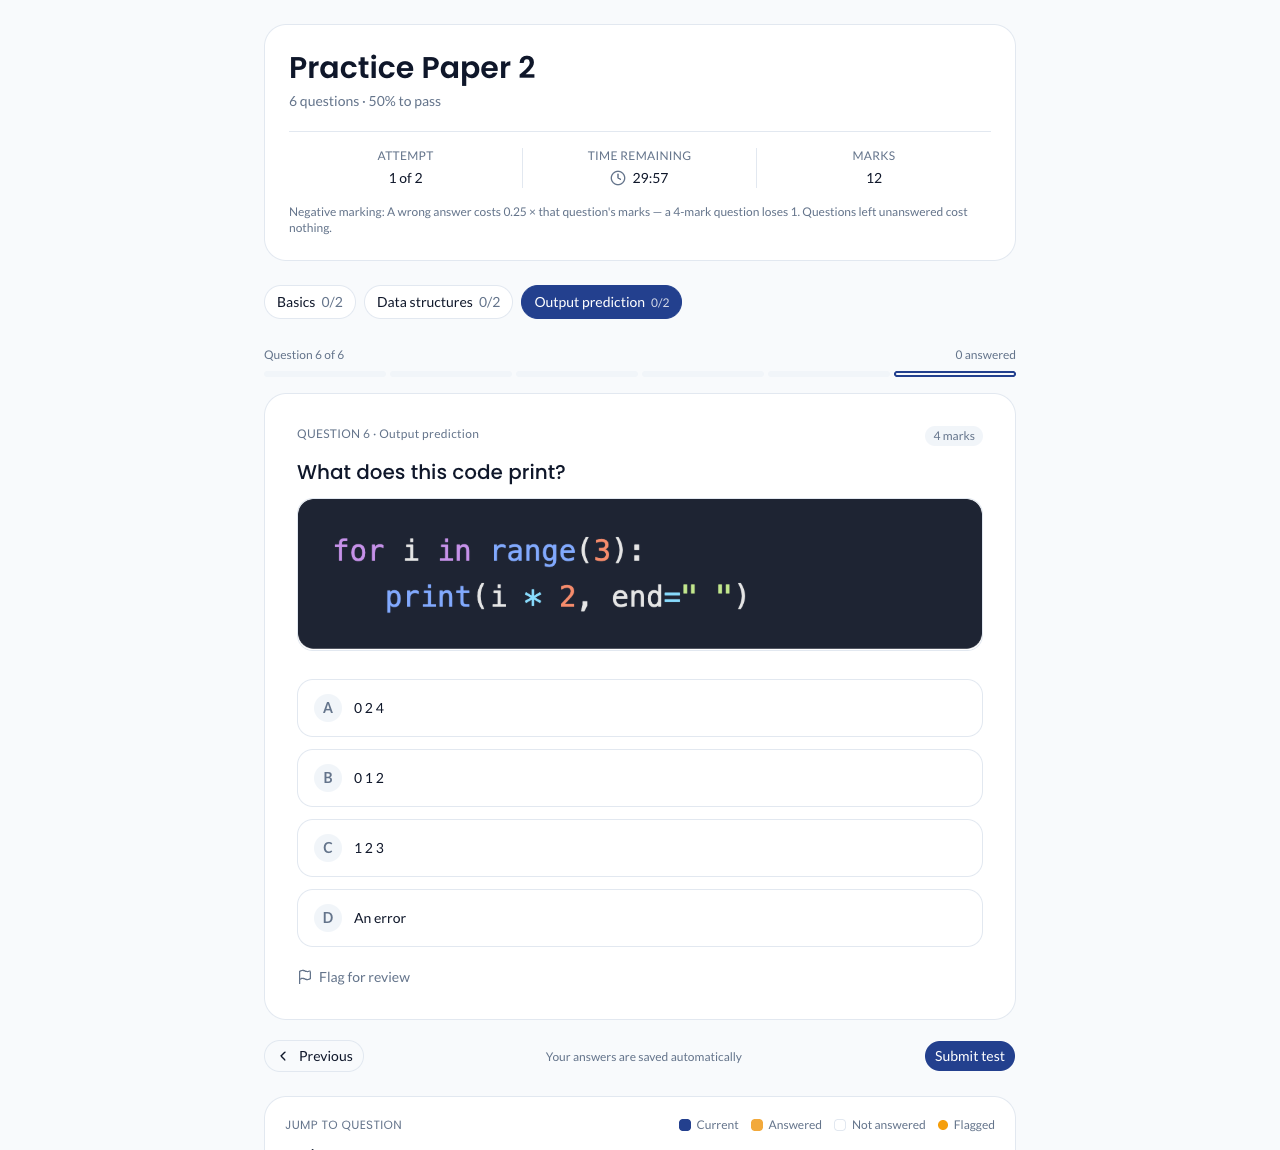
During the quiz they move with Previous and Next question, or jump to any question from the numbered list under it. A key under the list explains its colours: Current, Answered, Not answered and Flagged. On a computer they can also answer with the keyboard: A, B, C… or 1, 2, 3… picks an option, and the ← → arrow keys move between questions. Answers save as they go. If they leave and come back, they land on the first question they haven't answered.
Submit quiz (Submit test in an online test) appears on the last question, and on every question once all of them are answered, so a student who goes back to check an answer can submit from there. Nothing is handed in straight away: a Submit this quiz? box (Submit this test? in an online test) first tells them how many questions they have answered, how many are flagged, and whether this is their last attempt. If some are unanswered, they can jump to the first one with Go to question instead.
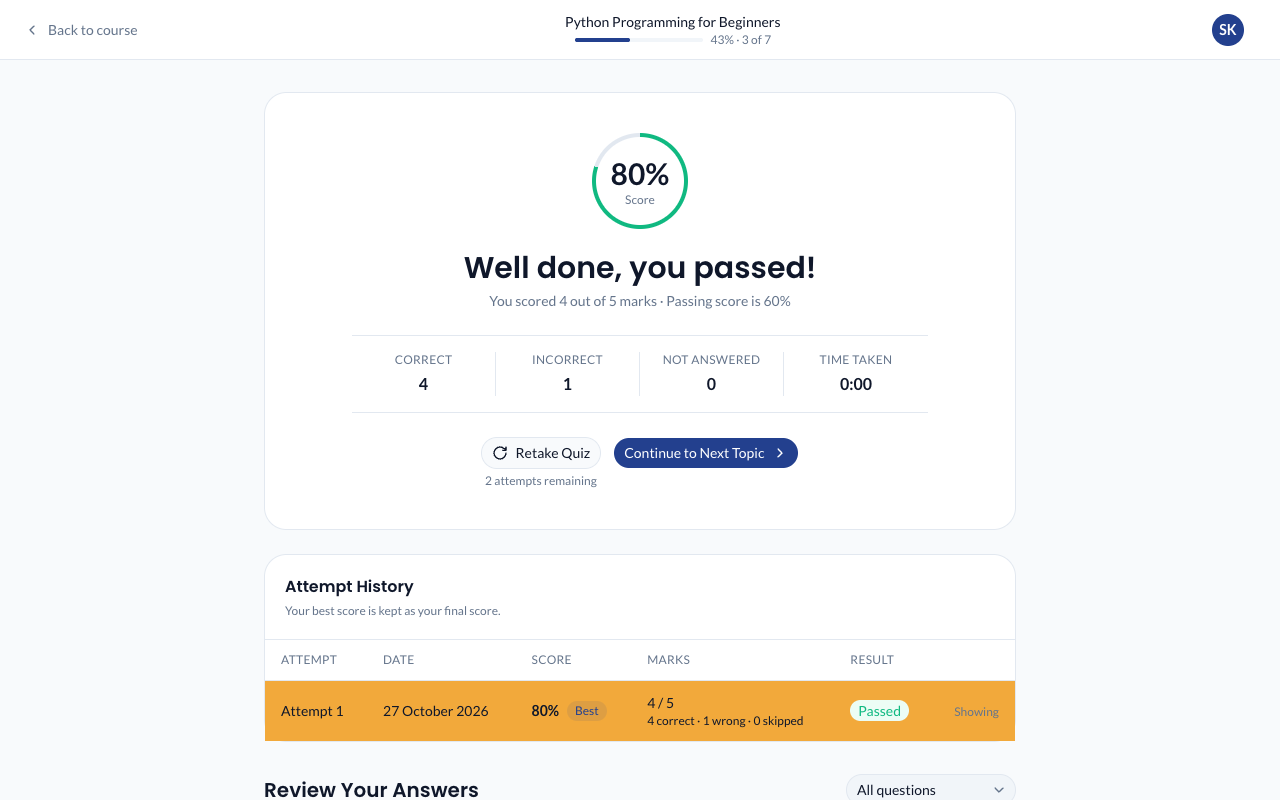
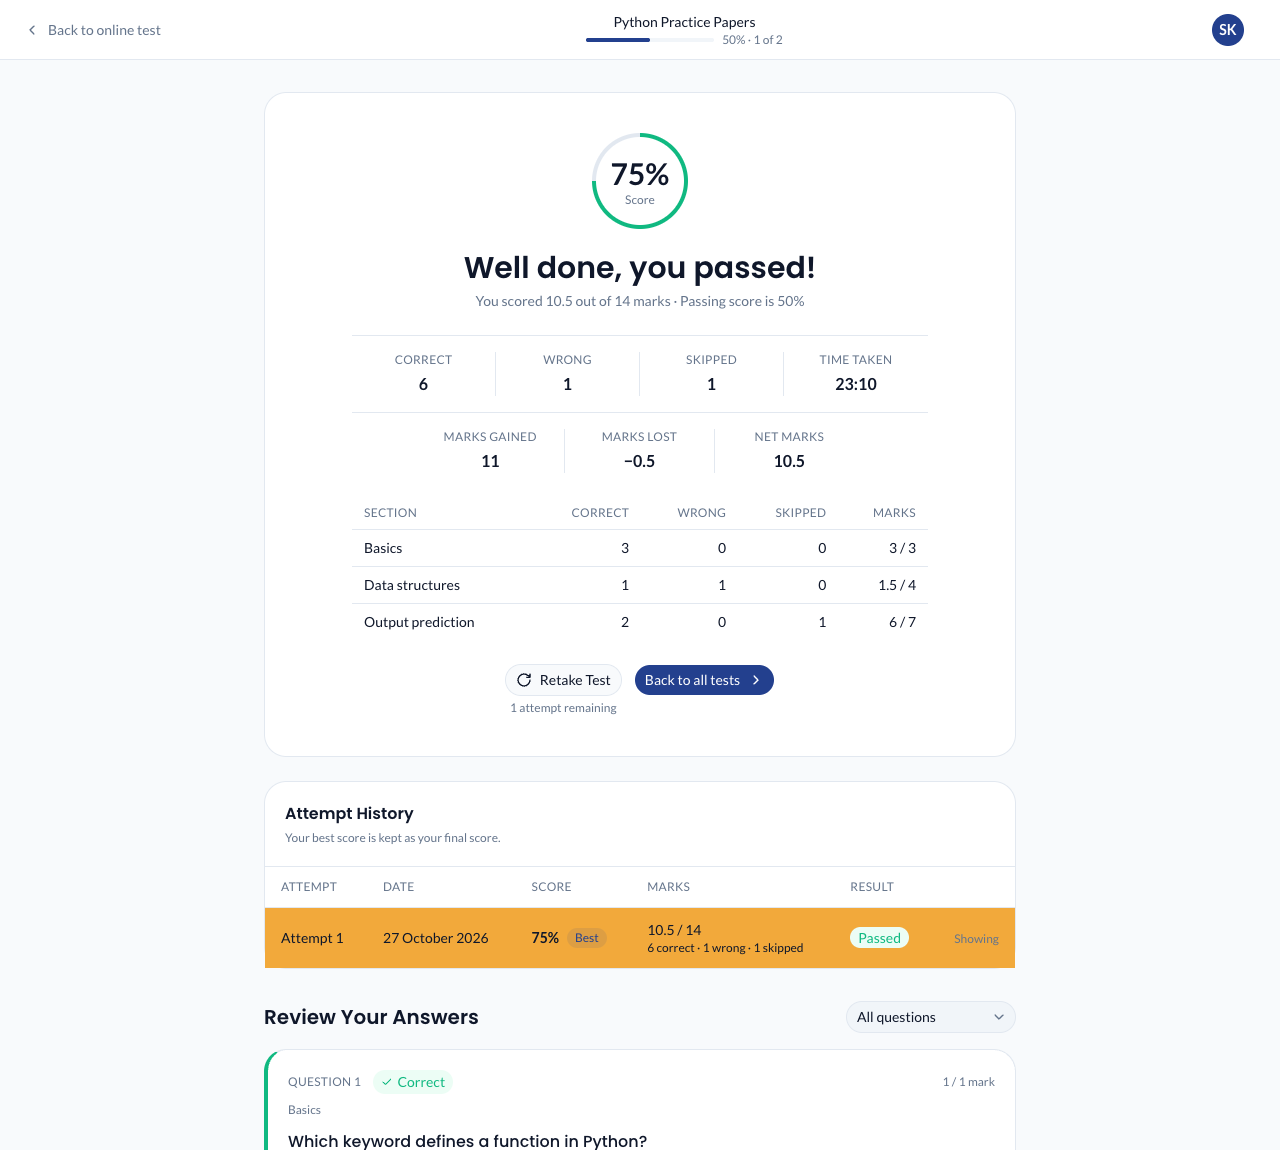
After submitting they see their score, "Well done, you passed!" or "Not quite this time", how many answers were Correct, Incorrect and Not answered, the time taken, and their attempt history. With negative marking, the counts read Correct, Wrong and Skipped, and they also see the marks gained and lost. With categories, they see their marks in each. They see the correct answers only if you allowed it in the quiz settings. Their best score is the one that counts. When they have used all their attempts, they see "No attempts remaining".
7. Certificates
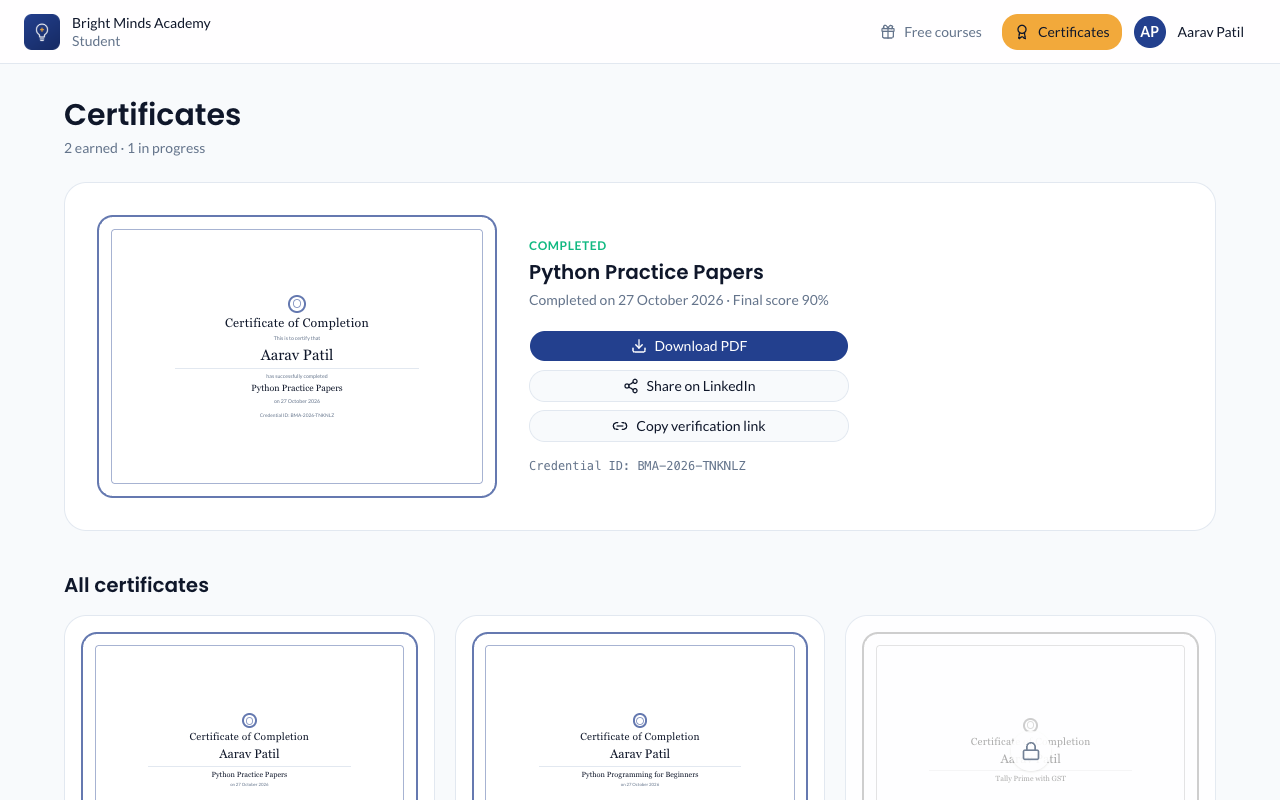
When a student finishes every required topic on a course, their certificate is issued automatically. On the Certificates page they can:
- Download PDF
- Share on LinkedIn
- Copy verification link: anyone with the link can check the certificate is genuine, without an account.
Note: If you leave Signed by empty in Branding, the PDF is signed in the name of the course's instructor instead.
The Certificates page is also where students choose which emails they get from your academy, and whether they arrive one at a time (Immediate) or together in a Daily digest. If a student says they never get your emails, ask them to check these settings.
On a phone
Your academy works in any phone browser. There's nothing to install. On a small screen, students move between My Courses, Free (when you have free courses), Certificates and Account using the bar at the bottom. Account holds My purchases, when they have bought a course, Change password and Sign out.
Related
- Troubleshooting: common student problems and their fixes.
- How enrollment works